Location Management
Learn how to manage your locations, create PDF files, add our web widget, and more.
System Overview
The location management system allows you to create and organize different locations where reports can be submitted. Each location has its own QR code, printable flyer, and shareable link for easy access.
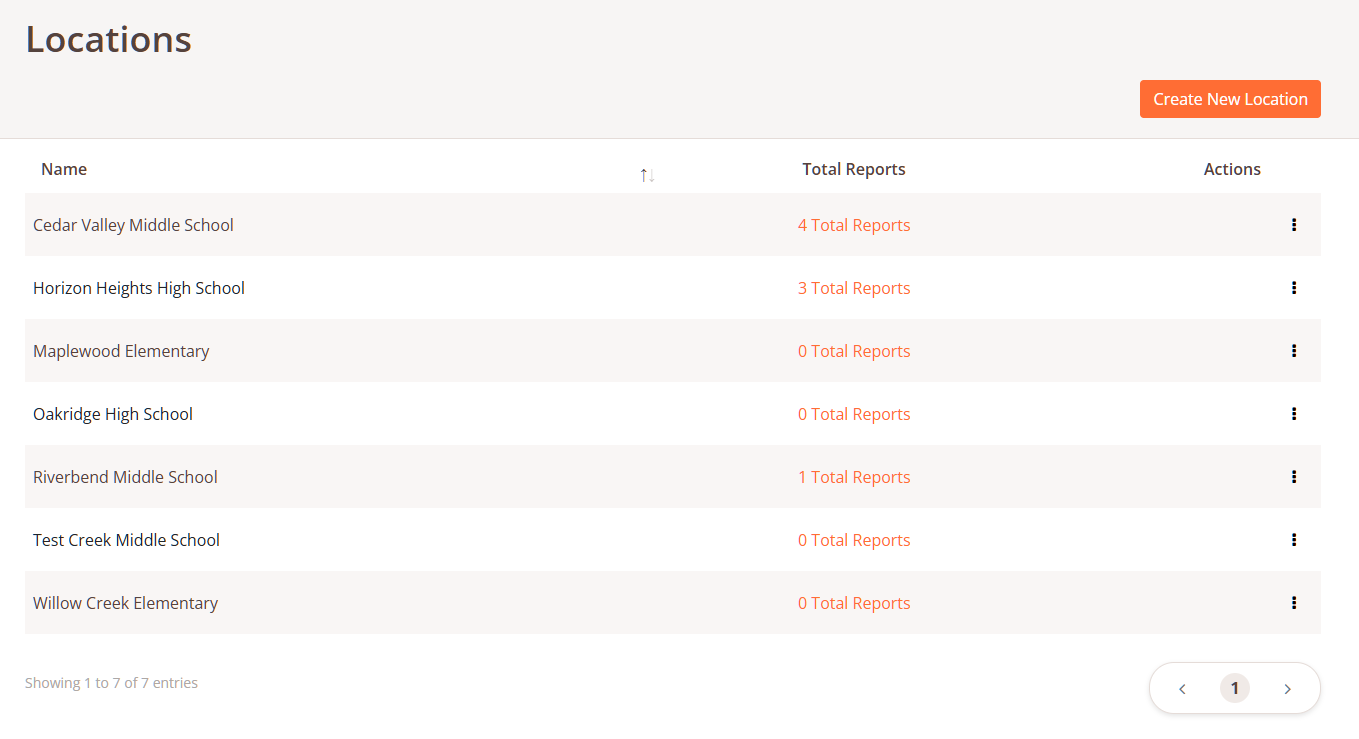
Location management dashboard
Key Features
- Location Creation: Create named locations for report collection
- QR Code Generation: Each location gets a unique QR code for easy reporting
- PDF Flyers: Customizable PDF flyers to print and display at physical locations
- URL Sharing: Easily copy and share direct submission links
- Embed Widget: Add the reporting widget to your own website
- Report Tracking: See how many reports are submitted for each location
Creating Locations
You can create new locations that will each have their own unique QR code and reporting link:
- Click the "Create New Location" button at the top of the Locations page
- Enter a descriptive name for the location (e.g., "Main Office Lobby", "Warehouse B")
- Click "Submit" to generate the new location
Once created, the location will appear in your locations table with all associated tools and options.
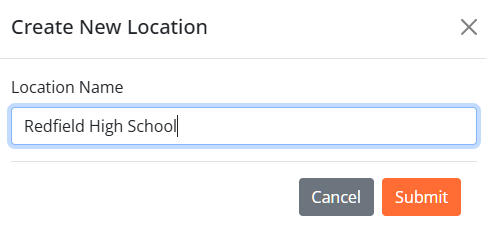
Creating a new location
Managing Locations
The locations dashboard provides several tools for managing your locations:
Location Table
The main table shows all your locations with the following information:
- Location name
- Total number of reports submitted
- Action buttons for QR code, PDF, link sharing, and embed code
Editing Locations
To edit a location name:
- Click the three-dot menu button on the right side of the location row
- Select "Edit Location" from the dropdown menu
- Enter the new name in the modal dialog
- Click "Change Name" to save your changes
Deleting Locations
To delete a location:
- Click the three-dot menu button on the right side of the location row
- Select "Delete Location" from the dropdown menu
- Confirm the deletion in the confirmation dialog
Note: Deleting a location will not delete any reports that have already been submitted to it.
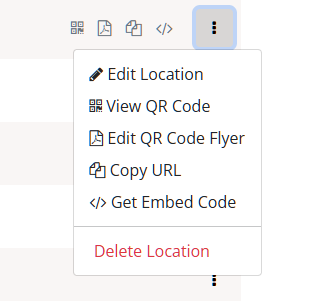
Location management options
QR Codes & Materials
Each location has its own unique QR code that can be used for report submissions. Several options are available for utilizing these codes:
Viewing QR Codes
To view a location's QR code:
- Click the QR code icon in the actions column, or
- Select "View QR Code" from the dropdown menu
Sharing URLs
Share direct links to the reporting form:
- Click the copy icon in the actions column, or
- Select "Copy URL" from the dropdown menu
- The link will be copied to your clipboard, ready to share via email, messaging, or social media
PDF Flyers
Create printable flyers with your QR code:
- Click the PDF icon in the actions column, or
- Select "Edit QR Code Flyer" from the dropdown menu
- Customize the flyer with your preferred text and styling
- Print the PDF to display at your physical location
- Feel free to paste in images!
- The QR code icon in the editor will add your locations QR code to the flyer
PDF editor with QR code
Website Embedding
The embedding feature allows you to integrate the reporting widget directly into your own website:
Getting the Embed Code
- Click the code icon in the actions column, or
- Select "Get Embed Code" from the dropdown menu
- Copy the provided JavaScript code
- Paste the code into your website where you want the widget to appear
Widget Functionality
Once embedded, the widget will:
- Provide a simple button that opens the reporting form when clicked
- Automatically associate submitted reports with the correct location
- Allow users to submit reports without leaving your website
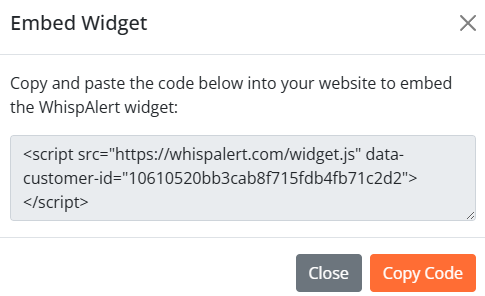
Embedding the reporting widget on a website
Report Tracking
The location management system makes it easy to track reports by location:
Viewing Reports by Location
To view all reports for a specific location:
- Click on the "X Total Reports" link in the location's row
- The reports dashboard will open, pre-filtered to show only reports from that location
Analytics
Use the location-specific reporting to:
- Identify locations with high incident rates
- Compare reporting volumes across different locations
- Track resolution rates by location
- Identify trends and patterns in reporting behavior
Location-specific report tracking